With the introduction of Business Central Cloud, many NAV and Business Central developers have encountered the concept of OAuth. This requires the creation of an App Registration in Azure, which provides a Client Secret that can be used to call Business Central APIs. However, a crucial aspect often overlooked by developers and consultants is the expiry date of a Client Secret. Without a proper system in place to manage this, systems relying on your Client Secret to connect to Business Central will eventually stop working once the secret expires.
A common, yet flawed, solution is to set a calendar reminder for when the Client Secret is about to expire. The assigned person then creates a new secret and manually updates the variables in the systems that use it. This method has several vulnerabilities:
- Human Dependency: If the person responsible is unavailable due to illness or vacation, the renewal process is jeopardized.
- Security Risks: Client Secrets should not be disseminated across multiple systems. Centralizing them ensures better security and manageability.
To address these issues, we will explore how to use an Azure Logic App to automatically create a new Client Secret for an App Registration and update it in an Azure Key Vault. This approach centralizes the management of Client Secrets and allows systems to access the secret through the Azure Key Vault. This setup enables automatic renewal of the Client Secret as frequently as needed without risking any connection failures.
Setting Up the App Registration with Microsoft Graph Access
The first step is to create an App Registration that has access to Microsoft Graph. This can be either the same App Registration you plan to use for Business Central or a separate one. Creating a separate App Registration can help distribute responsibilities across different resources. However, for simplicity, we will use the same App Registration in this guide.
Steps to Create a Client Secret
- Navigate to App Registrations:
- Go to the Azure portal and navigate to “App Registrations.”
- Select the App Registration you will use.
- Create a Client Secret:
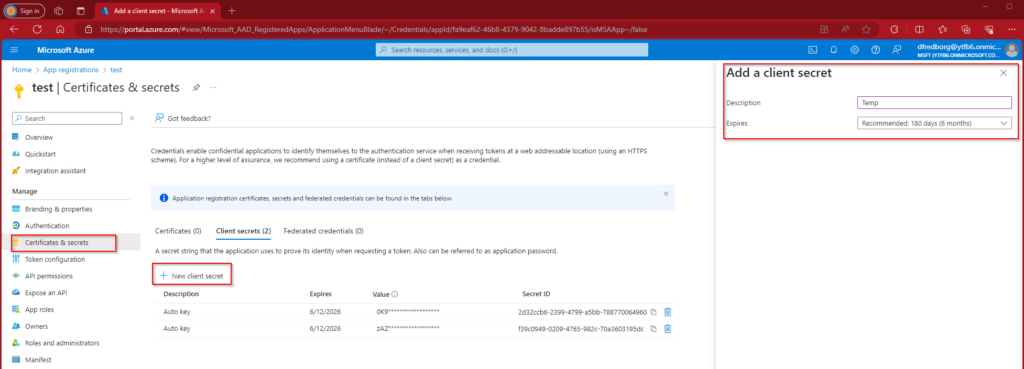
- In the left-hand menu, select “Certificates & secrets.”
- Click on “New client secret.”
- Configure the Client Secret:
- Provide a description for the Client Secret. The description and expiration date are not critical here since this secret will be used only once before being replaced automatically.
- After creating the Client Secret, copy it immediately. You will not be able to see it again once you leave this page. This Client Secret will be needed later in the process.
By following these steps, you have now created an App Registration with a Client Secret. This setup is essential for enabling the automated creation and management of Client Secrets using Azure Logic Apps.
Configuring API Permissions for Microsoft Graph
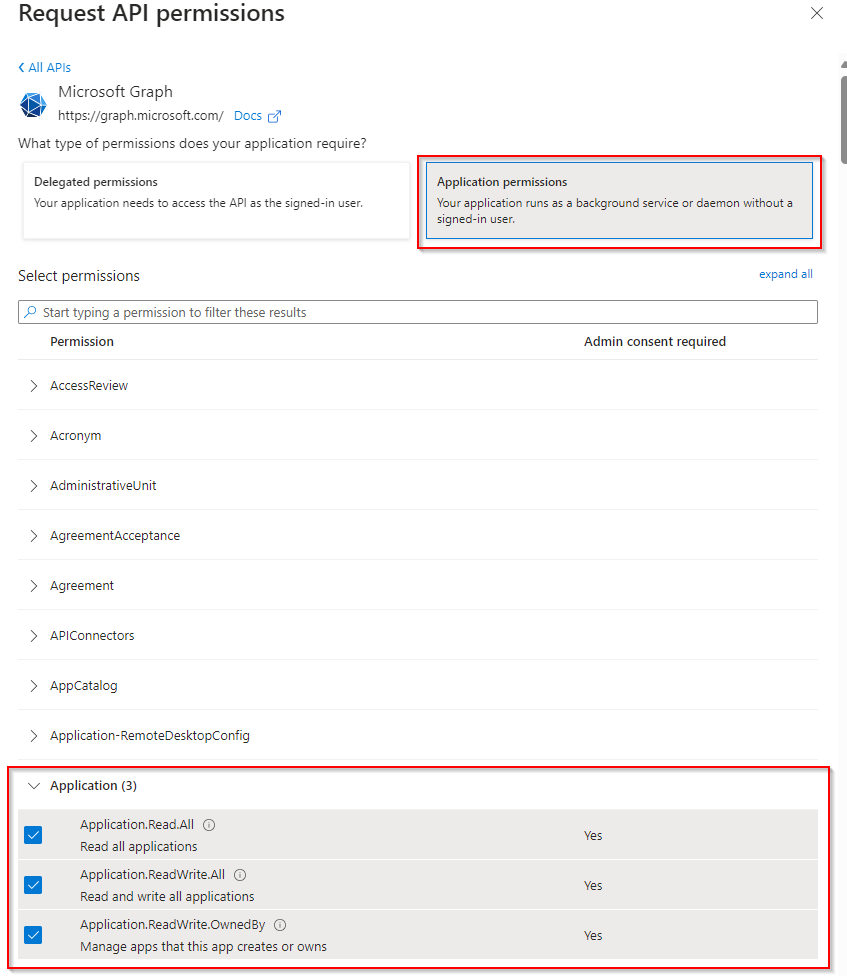
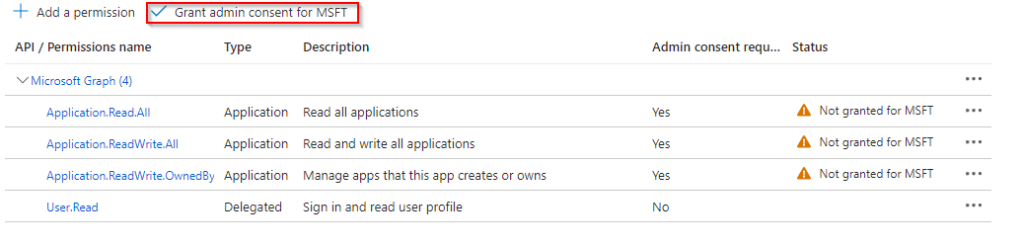
Next, we need to configure API permissions for our App Registration to allow access to Microsoft Graph. The necessary permissions are Application.Read.All, Application.ReadWrite.All, Application.ReadWrite.OwnedBy, and User.Read.
Steps to Add API Permissions
- Navigate to API Permissions:
- In the Azure portal, go to your App Registration.
- Select the “API permissions” menu item.
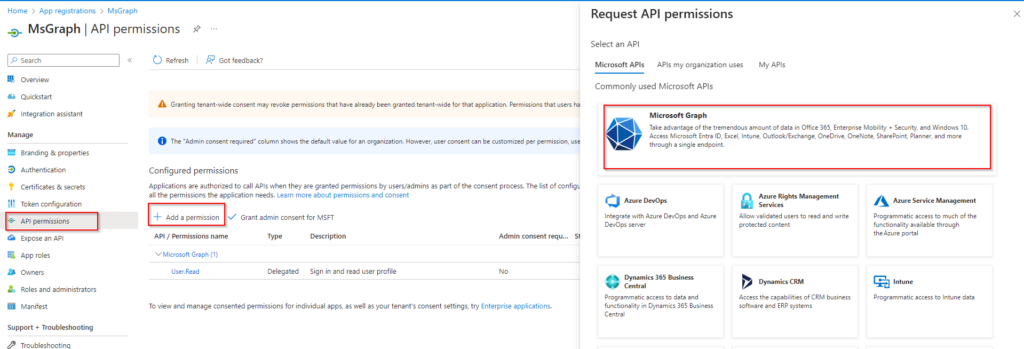
- Add Permissions:
- Click on the “Add a permission” button.
- Choose “Microsoft Graph” from the list of APIs.
- Select “Application permissions” and add the following permissions:
Application.Read.AllApplication.ReadWrite.AllApplication.ReadWrite.OwnedByUser.Read
- Grant Admin Consent:
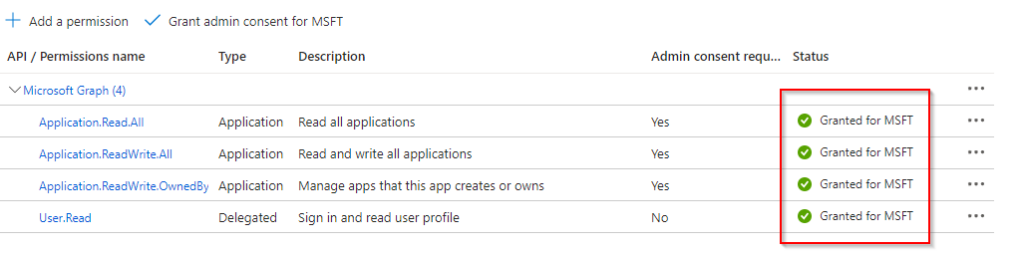
- After adding these permissions, you must grant admin consent. Click on the “Grant admin consent” button.
- Confirm the action. Once this is done, you should see a green check mark next to each permission, indicating they have been granted successfully.
By completing these steps, your App Registration will have the necessary permissions to interact with Microsoft Graph, allowing for the creation and management of Client Secrets.
Setting Up Azure Key Vault
Next, we need to create an Azure Key Vault to securely store our Client Secret. This section will guide you through creating the Key Vault and adding your secret.
Steps to Create Azure Key Vault
- Navigate to Azure Key Vault:
- In the Azure portal, search for “Azure Key Vault” and select it.
- Click on the “Create” button.
- Configure the Key Vault:
- Fill in the required details, such as the subscription, resource group, and key vault name.
- Choose your preferred region and pricing tier.
- Set Access Policy:
- For simplicity, we will use the Vault access policy. While Azure role-based access control (RBAC) is generally recommended for its flexibility and security, this blog post will use Vault access policy to keep things straightforward.
- Under the “Access Policy” section, click on “Add Access Policy.”
- Assign the necessary permissions for managing secrets.
- Create the Key Vault:
- Review your settings and click “Create” to provision your Key Vault.
- Add a Secret:
- Once your Key Vault is created, navigate to it.
- In the left-hand menu, select “Secrets.”
- Click on “Generate/Import” to add a new secret.
- Provide a name for your secret and enter the value (the Client Secret you created earlier).
By following these steps, you will have a Key Vault set up with your Client Secret securely stored. This Key Vault will be used by the Azure Logic App to store and manage Client Secrets automatically.
Creating the Azure Logic App
The next step is to create the Azure Logic App that will automate the creation and storage of Client Secrets.
Steps to Create the Logic App
- Navigate to Logic Apps:
- In the Azure portal, search for “Logic Apps” and select it.
- Click on the “Create” button.
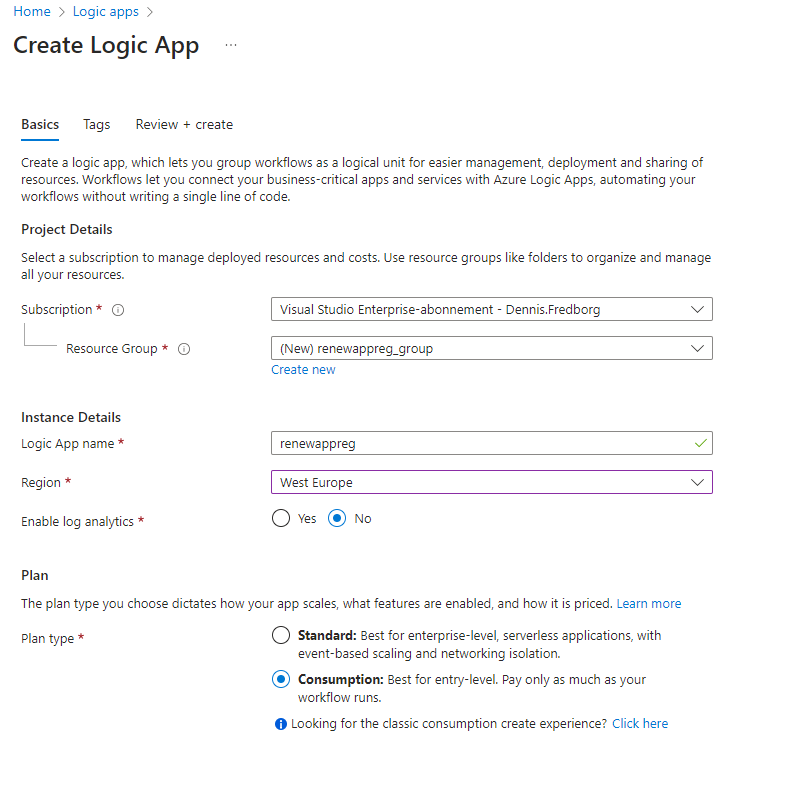
- Configure the Logic App:
- Fill in the required details, such as the subscription, resource group, and name of the Logic App.
- Choose your preferred region and pricing plan.
- Create the Logic App:
- Review your settings and click “Create” to provision your Logic App.
Once the Logic App is created, we will proceed to configure it to automate the renewal of the Client Secret and its storage in the Azure Key Vault.
Setting Up Managed Identity for the Logic App
To securely connect our Logic App to the Azure Key Vault, we will set up a managed identity. Using a managed identity is preferred over using connection strings because Azure handles all authentication, enhancing security and simplifying the process.
Steps to Set Up Managed Identity
- Enable Managed Identity:
- In the Azure portal, navigate to your Logic App.
- In the left-hand menu, select “Identity.”
- Set the “Status” to “On” under the “System assigned” tab.
- Assign Azure Roles:
- After enabling the managed identity, click on “Azure role assignments.”
- Press the “Add role assignment” button.
- Select your scope, which in this case should be “Key Vault.”
- Choose your Key Vault resource.
- Select an appropriate role. Ideally, you should select the role with the least permissions required. For simplicity in this tutorial, we will choose the “Owner” role. However, in a production environment, you should opt for a role that adheres to the principle of least privilege.
By setting up a managed identity for your Logic App, Azure will handle all authentication, making the connection to the Azure Key Vault more secure and manageable.
Creating the Workflow in the Logic App
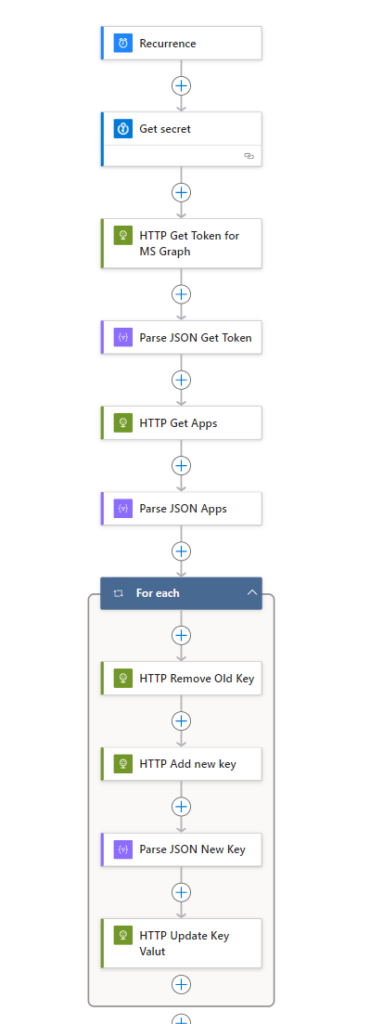
Now that our Logic App is set up with a managed identity, we need to create a workflow to automatically rotate our Client Secret. The workflow will run on a recurring schedule.
Steps to Create the Workflow
- Set Up Recurrence:
- In your Logic App, go to the “Designer” tab.
- Add a new trigger and select “Recurrence” from the list of triggers.
- Configure the recurrence schedule according to how often you want the Client Secret to be rotated (e.g., every 30 days).
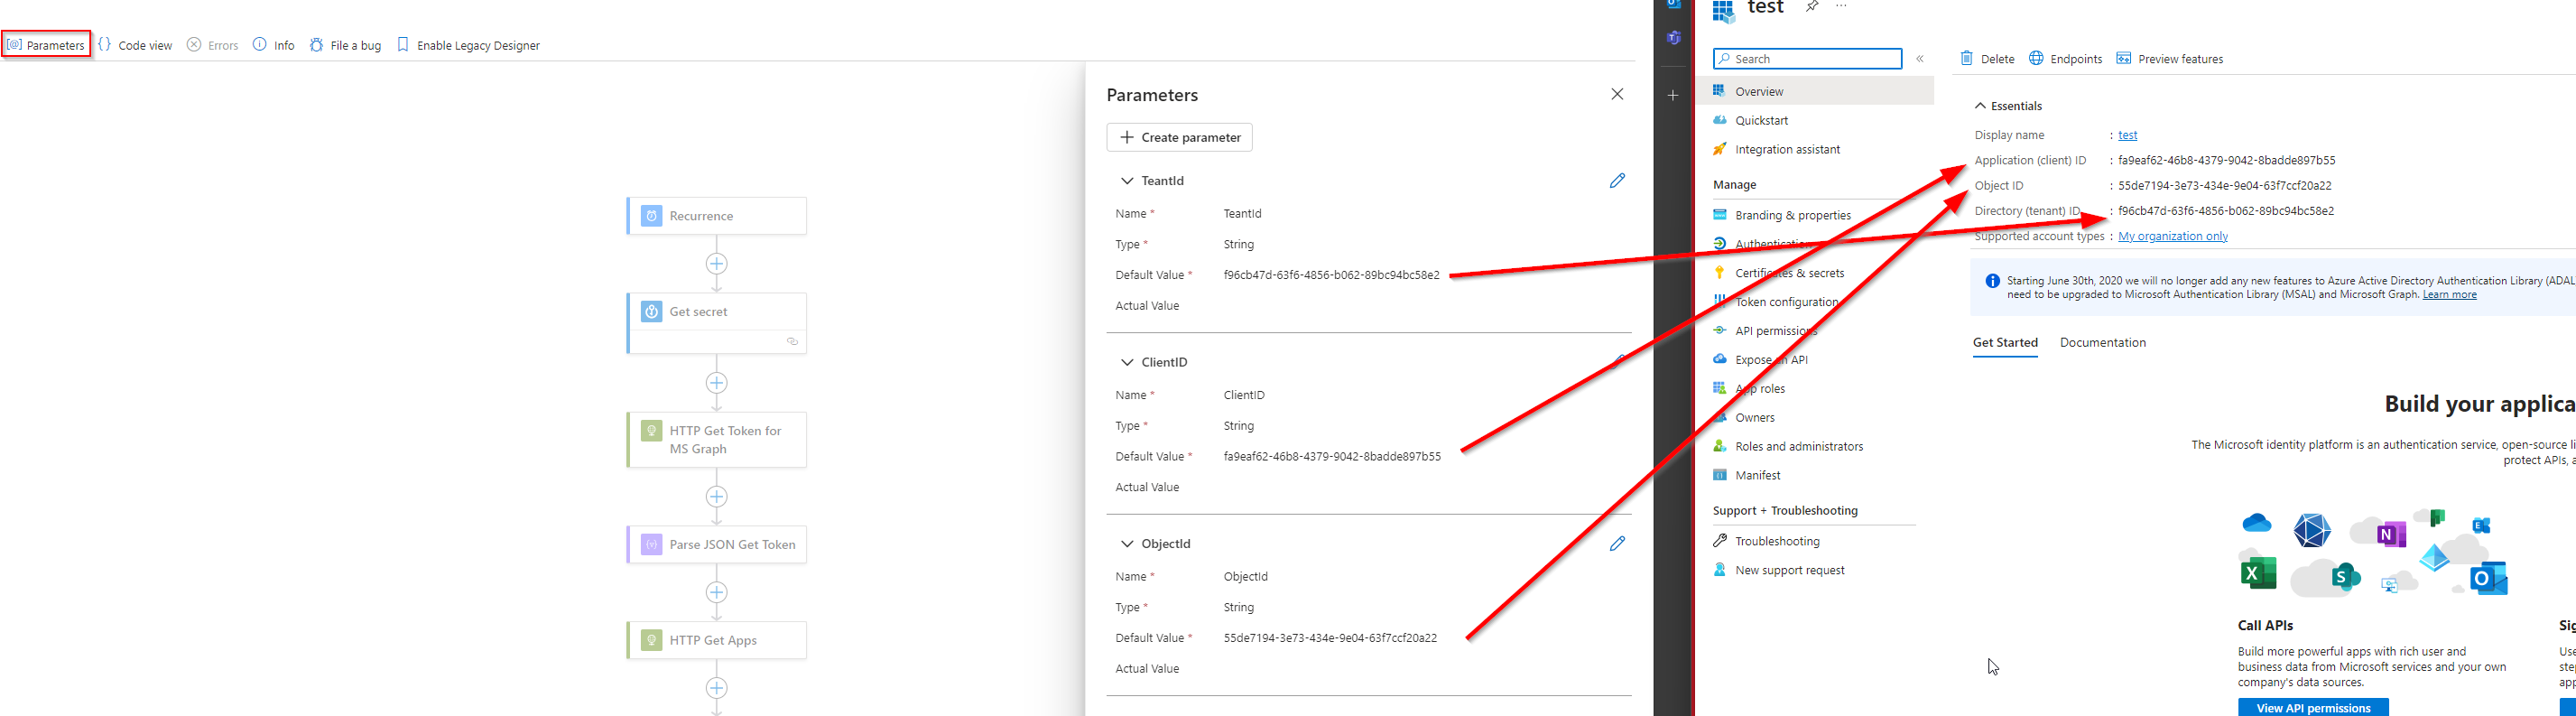
- Add Parameters:
- Set up three parameters:
TenantId,ClientId, andObjectId.TenantId: This is your Azure Active Directory (AAD) tenant ID.ClientId: This is the client ID from your App Registration.ObjectId: This is the object ID of the App Registration.
- Set up three parameters:
We will use the Azure Key Vault connector to access our Client Secret. Next, we will perform an HTTP request to obtain an access token. The URL for this request is:
https://login.microsoftonline.com/@{parameters('TenantId')}/oauth2/v2.0/tokenThe request will be of type POST with the content type set to application/x-www-form-urlencoded.
The body of the request should include the following:
client_id=@{parameters('ClientId')}
&scope=https://graph.microsoft.com/.default
&client_secret=@{body('Get_secret')?['value']}
&grant_type=client_credentials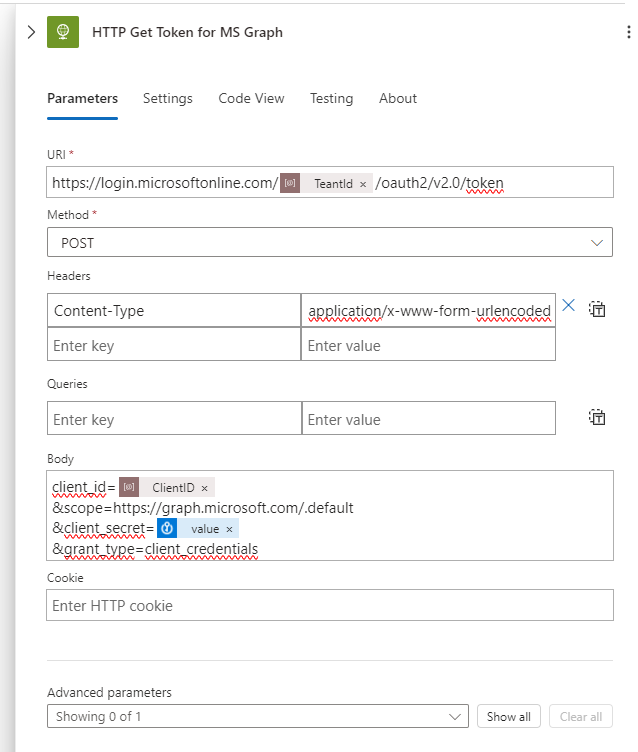
Next, we will parse the JSON response to extract the token using the Schema:
{
    "type": "object",
    "properties": {
        "token_type": {
            "type": "string"
        },
        "expires_in": {
            "type": "integer"
        },
        "ext_expires_in": {
            "type": "integer"
        },
        "access_token": {
            "type": "string"
        }
    }
}
and use it to call Microsoft Graph via an HTTP request. The URL for this request is:
https://graph.microsoft.com/v1.0/applications/{@{parameters('ObjectId')}}
We will make a GET request using the following header:
Authorization: Bearer @{body('Parse_JSON_Get_Token')?['access_token']}
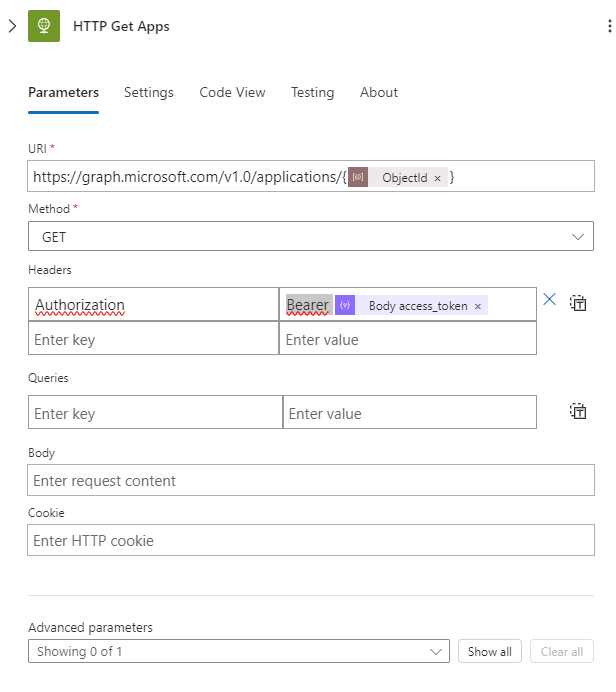
This will retrieve all our applications from Microsoft Graph using the ObjectID. Next, we will parse the JSON response using the following schema:
{
    "type": "object",
    "properties": {
        "@@odata.context": {
            "type": "string"
        },
        "id": {
            "type": "string"
        },
        "deletedDateTime": {},
        "appId": {
            "type": "string"
        },
        "applicationTemplateId": {},
        "disabledByMicrosoftStatus": {},
        "createdDateTime": {
            "type": "string"
        },
        "displayName": {
            "type": "string"
        },
        "description": {},
        "groupMembershipClaims": {},
        "identifierUris": {
            "type": "array"
        },
        "isDeviceOnlyAuthSupported": {},
        "isFallbackPublicClient": {},
        "nativeAuthenticationApisEnabled": {},
        "notes": {},
        "publisherDomain": {
            "type": "string"
        },
        "serviceManagementReference": {},
        "signInAudience": {
            "type": "string"
        },
        "tags": {
            "type": "array"
        },
        "tokenEncryptionKeyId": {},
        "uniqueName": {},
        "samlMetadataUrl": {},
        "defaultRedirectUri": {},
        "certification": {},
        "optionalClaims": {},
        "requestSignatureVerification": {},
        "addIns": {
            "type": "array"
        },
        "api": {
            "type": "object",
            "properties": {
                "acceptMappedClaims": {},
                "knownClientApplications": {
                    "type": "array"
                },
                "requestedAccessTokenVersion": {},
                "oauth2PermissionScopes": {
                    "type": "array"
                },
                "preAuthorizedApplications": {
                    "type": "array"
                }
            }
        },
        "appRoles": {
            "type": "array"
        },
        "info": {
            "type": "object",
            "properties": {
                "logoUrl": {},
                "marketingUrl": {},
                "privacyStatementUrl": {},
                "supportUrl": {},
                "termsOfServiceUrl": {}
            }
        },
        "keyCredentials": {
            "type": "array"
        },
        "parentalControlSettings": {
            "type": "object",
            "properties": {
                "countriesBlockedForMinors": {
                    "type": "array"
                },
                "legalAgeGroupRule": {
                    "type": "string"
                }
            }
        },
        "passwordCredentials": {
            "type": "array",
            "items": {
                "type": "object",
                "properties": {
                    "customKeyIdentifier": {},
                    "displayName": {
                        "type": "string"
                    },
                    "endDateTime": {
                        "type": "string"
                    },
                    "hint": {
                        "type": "string"
                    },
                    "keyId": {
                        "type": "string"
                    },
                    "secretText": {},
                    "startDateTime": {
                        "type": "string"
                    }
                },
                "required": [
                    "customKeyIdentifier",
                    "displayName",
                    "endDateTime",
                    "hint",
                    "keyId",
                    "secretText",
                    "startDateTime"
                ]
            }
        },
        "publicClient": {
            "type": "object",
            "properties": {
                "redirectUris": {
                    "type": "array"
                }
            }
        },
        "requiredResourceAccess": {
            "type": "array",
            "items": {
                "type": "object",
                "properties": {
                    "resourceAppId": {
                        "type": "string"
                    },
                    "resourceAccess": {
                        "type": "array",
                        "items": {
                            "type": "object",
                            "properties": {
                                "id": {
                                    "type": "string"
                                },
                                "type": {
                                    "type": "string"
                                }
                            },
                            "required": [
                                "id",
                                "type"
                            ]
                        }
                    }
                },
                "required": [
                    "resourceAppId",
                    "resourceAccess"
                ]
            }
        },
        "verifiedPublisher": {
            "type": "object",
            "properties": {
                "displayName": {},
                "verifiedPublisherId": {},
                "addedDateTime": {}
            }
        },
        "web": {
            "type": "object",
            "properties": {
                "homePageUrl": {},
                "logoutUrl": {},
                "redirectUris": {
                    "type": "array",
                    "items": {
                        "type": "string"
                    }
                },
                "implicitGrantSettings": {
                    "type": "object",
                    "properties": {
                        "enableAccessTokenIssuance": {
                            "type": "boolean"
                        },
                        "enableIdTokenIssuance": {
                            "type": "boolean"
                        }
                    }
                },
                "redirectUriSettings": {
                    "type": "array",
                    "items": {
                        "type": "object",
                        "properties": {
                            "uri": {
                                "type": "string"
                            },
                            "index": {}
                        },
                        "required": [
                            "uri",
                            "index"
                        ]
                    }
                }
            }
        },
        "servicePrincipalLockConfiguration": {
            "type": "object",
            "properties": {
                "isEnabled": {
                    "type": "boolean"
                },
                "allProperties": {
                    "type": "boolean"
                },
                "credentialsWithUsageVerify": {
                    "type": "boolean"
                },
                "credentialsWithUsageSign": {
                    "type": "boolean"
                },
                "identifierUris": {
                    "type": "boolean"
                },
                "tokenEncryptionKeyId": {
                    "type": "boolean"
                }
            }
        },
        "spa": {
            "type": "object",
            "properties": {
                "redirectUris": {
                    "type": "array"
                }
            }
        }
    }
}
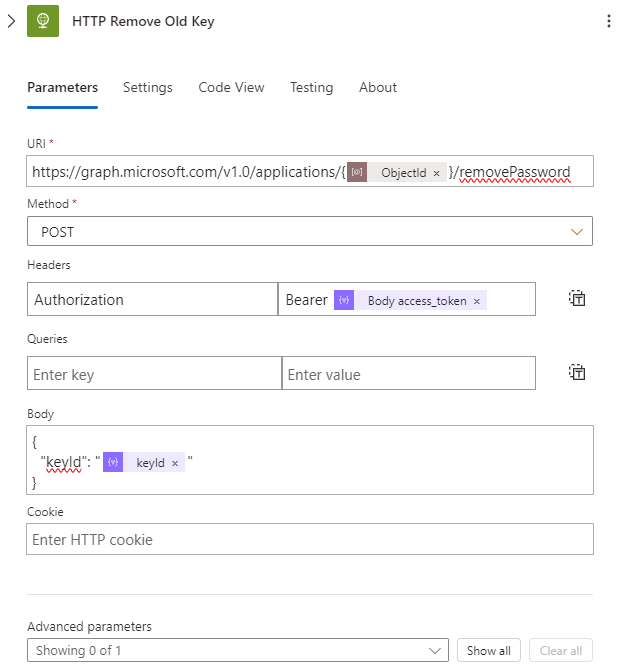
Next, for each keyId, we will delete the existing key using a POST request to the URL:
https://graph.microsoft.com/v1.0/applications/{@{parameters('ObjectId')}}/removePassword
using the following header:
Authorization: Bearer @{body('Parse_JSON_Get_Token')?['access_token']}
and with the following body:
{
  "keyId": "@{item()?['keyId']}"
}
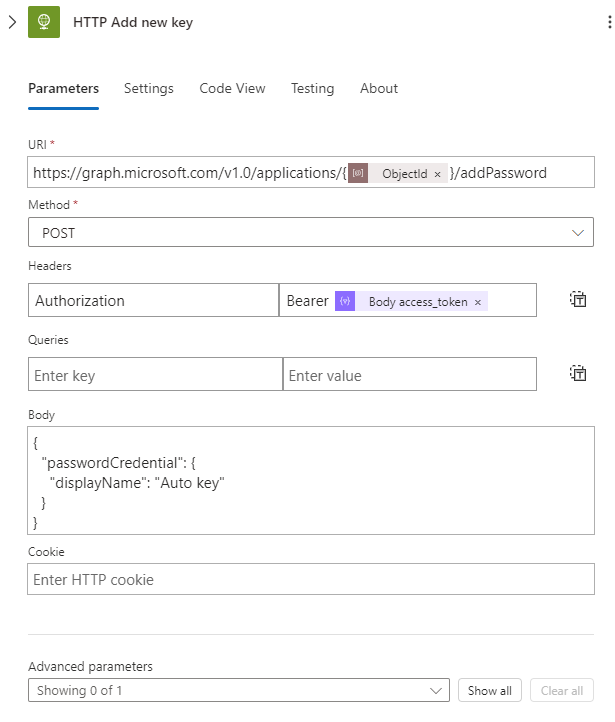
Next, we will create a new key using an HTTP request by performing a POST request against:
https://graph.microsoft.com/v1.0/applications/{@{parameters('ObjectId')}}/addPassword
with the following header:
Authorization: Bearer @{body('Parse_JSON_Get_Token')?['access_token']}
and the following body:
{
  "passwordCredential": {
    "displayName": "Auto key"
  }
}
In my body, I am setting the displayName to “Auto key,” but you can change this to whatever you prefer.
Once the key is created in our App Registration, we parse the JSON response using the following schema:
{
    "type": "object",
    "properties": {
        "@@odata.context": {
            "type": "string"
        },
        "customKeyIdentifier": {},
        "displayName": {
            "type": "string"
        },
        "endDateTime": {
            "type": "string"
        },
        "hint": {
            "type": "string"
        },
        "keyId": {
            "type": "string"
        },
        "secretText": {
            "type": "string"
        },
        "startDateTime": {
            "type": "string"
        }
    }
}
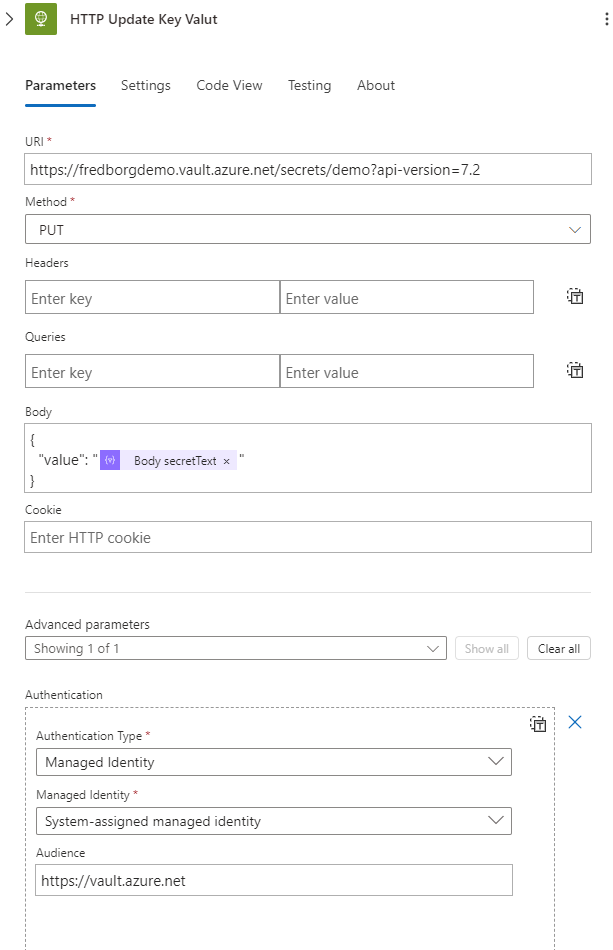
Lastly, we make an HTTP PUT request to our Azure Key Vault using the following URL:
https://fredborgdemo.vault.azure.net/secrets/demo?api-version=7.2
where “demo” is the name of my secret. The body of the request will be:
{
  "value": "@{body('Parse_JSON_New_Key')?['secretText']}"
}
The authentication is handled using Managed Identity with the audience set to:
https://vault.azure.net
This will update the Key Vault with the new Client Secret.
And that’s all there is to it! You now have a flow that will automatically rotate your Client Secrets and store them in an Azure Key Vault. This setup ensures that your secrets are managed securely and efficiently.
Thank you for reading. I hope you learned something new from this blog post.